This guide walks you through migrating from Vercel to Appwrite Sites, covering project setup, configuration, routing, and serverless functionality.
Prerequisites
Before starting your migration:
- Have access to your Vercel project dashboard
- Ensure you can modify your domain's DNS settings
- Prepare your source code repository
Platform differences
Understanding the key differences between Vercel and Appwrite Sites will help you plan your migration effectively.
| Feature | Vercel | Appwrite Sites |
DNS configuration | Uses A records for apex domains | Uses NS records for apex domains |
Configuration approach | Platform-level configuration via vercel.json | Framework-native configuration with SSR support |
Redirects | Platform-level path redirects via vercel.json | Domain-level redirects and framework-level path redirects |
Migration process
Follow these steps to move your application from Vercel to Appwrite Sites.
Start by setting up a new project in Appwrite:
- Sign in to the Appwrite Console
- Click Create Project
- Enter a name for your project and click Create
Your new project will serve as the container for your migrated site and any other Appwrite services you might need.
Next, create a new site by connecting your existing repository:
- In your Appwrite project, select Sites from the sidebar
- Click Create Site
- Select Connect a repository
- Authenticate with GitHub
- Select the repository containing your Vercel project
- Choose your production branch (typically
main)
Appwrite will auto-detect your framework. Verify this is correct or select manually from the dropdown menu.
Configure your domain
One of the differences between Vercel and Appwrite is how they handle domain configuration for apex domains. Vercel uses A records for apex domains, while Appwrite uses nameserver (NS) records. This means you'll need to delegate DNS management to Appwrite.
Migrating an apex domain
Before migrating, row your current Vercel DNS configuration:
- In Vercel, go to project settings > Domains
- Note any custom DNS records you've configured (MX, TXT, etc.)
- Don't remove the domain from Vercel until Appwrite is fully configured
Add your apex domain to your Appwrite site:
- Navigate to your site > Domains tab
- Click Add domain
- Enter your apex domain (e.g.,
example.com) - Select Active deployment as the domain rule type
- Note the NS records Appwrite provides:
ns1.appwrite.zonens2.appwrite.zone
At your domain registrar:
- Update your domain's nameservers to point to Appwrite's nameservers
- If you had custom DNS records in Vercel (like MX records for email), you'll need to recreate these in Appwrite's DNS configuration
Important DNS change note
Changing nameservers delegates your entire domain's DNS management to Appwrite. DNS changes can take up to 48 hours to fully propagate.
Migrating a subdomain
For subdomains, both Vercel and Appwrite use CNAME records, making the migration process simpler.
- Navigate to your site > Domains tab
- Click Add domain
- Enter your subdomain (e.g.,
www.example.com) - Select Active deployment as the domain rule type
- Copy the CNAME value provided by Appwrite
At your domain registrar or DNS provider:
- Create or update the CNAME record for your subdomain
- Point it to the value provided by Appwrite
- Wait for DNS propagation and verification
Domain rule types
When adding a domain in Appwrite, you can choose from three rule types: Active deployment, Git branch, or Redirect.
Learn more about domain rule types
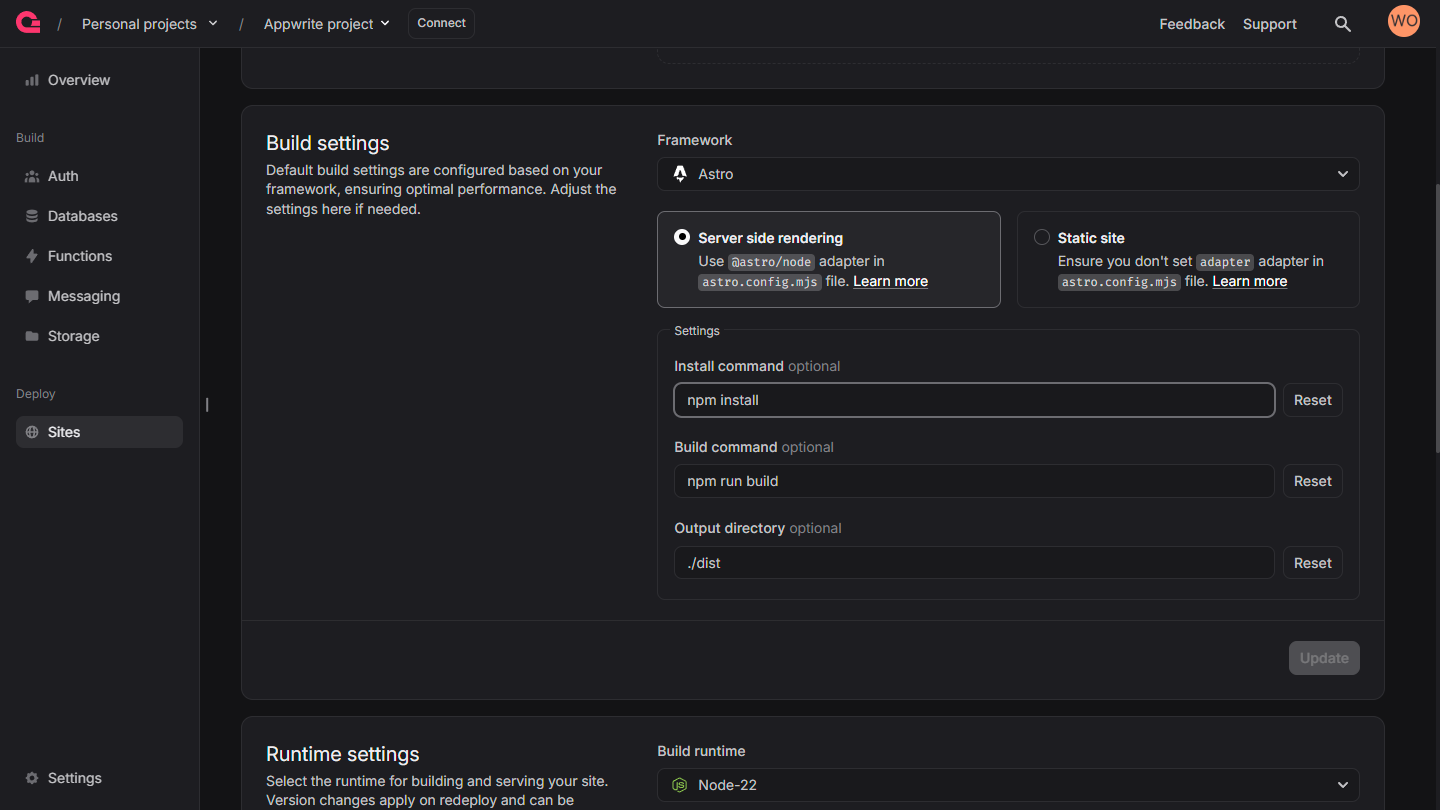
Configure build settings
After setting up your project and domain, you'll need to configure your build settings to match your Vercel configuration.
Navigate to your site > Settings > Build settings and configure the following:
- Framework: Appwrite will attempt to automatically detect your framework. Verify and ensure it is the same framework as in Vercel.
- Install command: Enter the same install command from Vercel
- Build command: Enter the same build command from Vercel
- Output directory: Enter the same output directory from Vercel
- Root directory: If your app is in a monorepo subdirectory, specify the path
- Rendering: Select the appropriate rendering mode (Static or SSR)
Framework defaults
Appwrite automatically detects and applies default settings for popular frameworks like Next.js, Nuxt, SvelteKit, Angular, and Astro.
Learn more about framework defaults and project dependencies
Manage environment variables
Environment variables require special attention during migration, as they control how your application behaves in different environments.
Before migrating, row all your Vercel environment variables:
- In Vercel, go to your project settings > Environment Variables
- Row all variables, noting which are for development, preview, or production
- Identify any system variables your application relies on
System variables
Vercel automatically provides system variables like VERCEL_URL. You'll need to adapt your code to use Appwrite's equivalent system variables.
- Navigate to your site > Settings > Environment variables
- Click the plus (+) icon to add a new variable
- Enter the key and value for each variable. You can optionally import a
.envfile. - Toggle Secret for sensitive variables that should be hidden
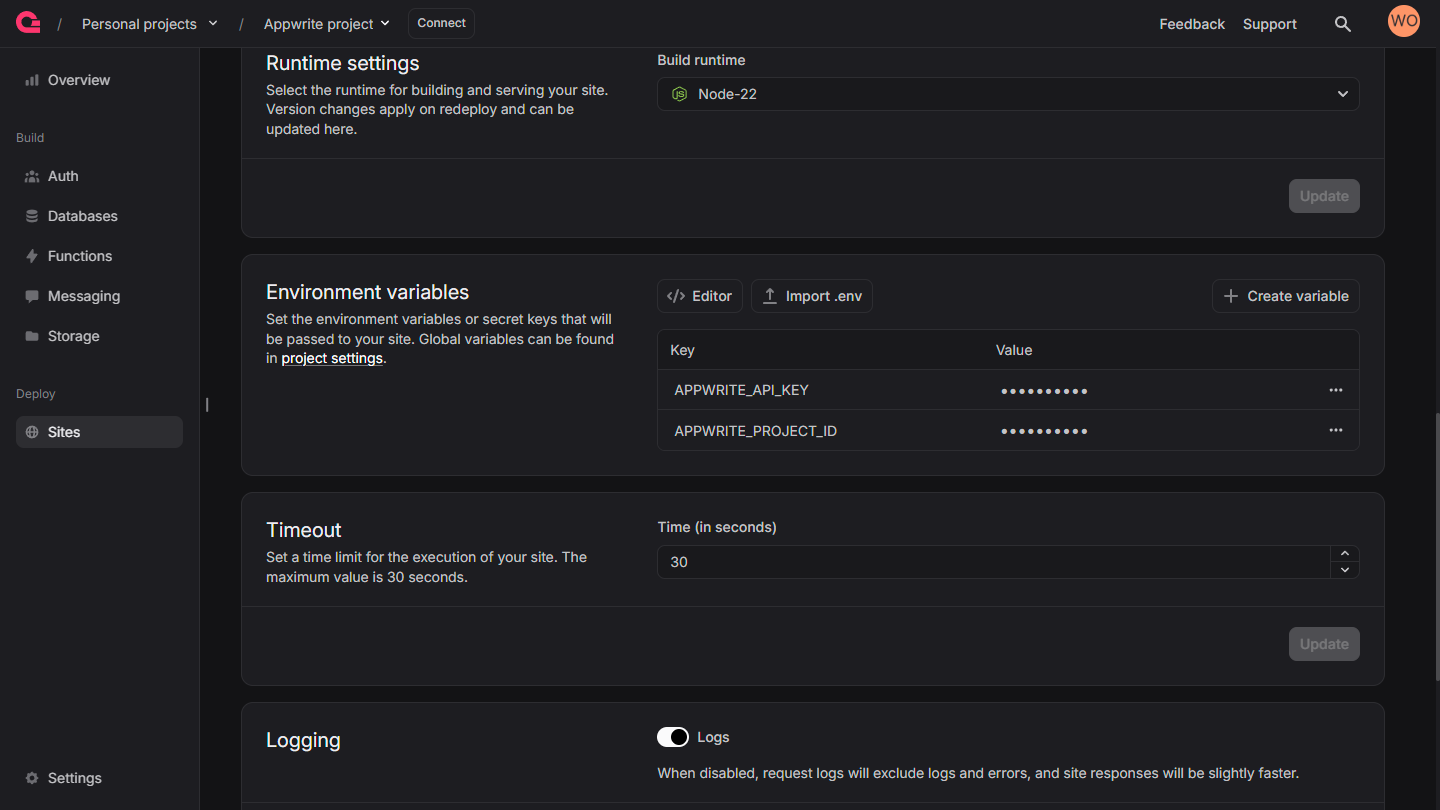
Appwrite system variables
Appwrite automatically injects these variables into your site:
| Variable | Description | Available at Build and/or Run Time |
APPWRITE_SITE_API_ENDPOINT | The API endpoint of the running site | Both |
APPWRITE_SITE_NAME | The name of the running site. | Both |
APPWRITE_SITE_DEPLOYMENT | The deployment ID of the running sites. | Both |
APPWRITE_SITE_PROJECT_ID | The project ID of the running site. | Both |
APPWRITE_SITE_RUNTIME_NAME | The runtime name of the running site. | Both |
APPWRITE_SITE_RUNTIME_VERSION | The runtime version of the running site. | Both |
APPWRITE_SITE_CPUS | The CPU (runtime) specification of the running site. | Both |
APPWRITE_SITE_MEMORY | The memory (runtime) specification of the running site. | Both |
Handle redirects and rewrites
One key difference between Vercel and Appwrite is how they handle redirects and rewrites.
Key difference
Vercel offers platform-level path redirects configured in vercel.json, while Appwrite provides domain-level redirects through the Domains tab and supports framework-level path redirects through your application code.
Appwrite's domain-level redirects are configured in the Domains tab of your site:
- Navigate to your site > Domains tab
- Click Add domain or select an existing domain
- Choose Redirect as the domain rule type
- Enter the destination URL and select an appropriate HTTP status code (301, 302, 303, 307, or 308)
Domain redirects in Appwrite do not preserve path or query parameters. For example, if you redirect example.com to appwrite.io, then example.com/docs?id=123 will redirect to appwrite.io (not appwrite.io/docs?id=123).
For path-based redirects, use your framework's built-in functionality:
Next.js
// next.config.js
module.exports = {
  async redirects() {
    return [
      {
        source: '/old-path',
        destination: '/new-path',
        permanent: true, // 308 status code
      },
    ];
  },
};
SvelteKit
// src/routes/+layout.server.js
export function load({ url }) {
  if (url.pathname === '/old-path') {
    return {
      status: 301,
      redirect: '/new-path'
    };
  }
}
Nuxt
// nuxt.config.js
export default {
  router: {
    extendRoutes(routes, resolve) {
      routes.push({
        path: '/old-path',
        redirect: {
          to: '/new-path',
          statusCode: 301
        }
      });
    }
  }
}
Migrate serverless functions
There are two approaches to serverless functions when migrating from Vercel to Appwrite:
Framework API routes vs. standalone functions
When using frameworks like Next.js, Nuxt, or SvelteKit with SSR enabled, your API routes will work natively within Appwrite Sites, just as they do in Vercel. For standalone serverless functions or more complex use cases, you can use Appwrite Functions.
For frameworks with built-in API routes:
- Next.js: API routes in
/pages/apior route handlers in/app/apiwork natively - Nuxt: Server API endpoints work as expected
- SvelteKit: Server routes and API endpoints function normally
No migration is needed for these framework-native API routes - they'll work automatically when you deploy your site with SSR enabled.
For standalone serverless functions or more complex use cases:
- In your Appwrite project, go to Functions
- Click Create Function
- Select a runtime that matches your needs (Node.js, Python, PHP, Ruby, etc.)
- Create your function code
- Deploy your function
Learn how to create and deploy functions
Framework API routes
When using framework API routes within Appwrite Sites (with SSR enabled), your endpoints remain the same:
- Vercel:
/api/hello - Appwrite Sites:
/api/hello(no change needed)
Your existing API routes code will work without modification:
// /api/hello.js in Next.js (works the same in both Vercel and Appwrite Sites)
export default function handler(req, res) {
  res.status(200).json({ message: 'Hello!' });
}
Standalone Appwrite Functions
If you're using standalone Appwrite Functions (outside your site's codebase), you'll need to update your frontend code to use the Appwrite Functions API:
// Calling an Appwrite Function from your frontend
import { Client, Functions } from 'appwrite';

const client = new Client()
    .setEndpoint('https://<REGION>.cloud.appwrite.io/v1')
    .setProject('your-project-id');

const functions = new Functions(client);

const response = await functions.createExecution('your-function-id');
Handle middleware
While Vercel offers platform-level Edge Middleware configured through vercel.json, Appwrite Sites fully supports framework-native middleware when using SSR. This means your existing middleware code will continue to work without modification.
Next.js
// middleware.js
export function middleware(request) {
  // Your middleware logic
}

export const config = {
  matcher: '/path/:path*',
};
SvelteKit
// src/hooks.server.js
export async function handle({ event, resolve }) {
  // Your middleware logic before response
  const response = await resolve(event);
  // Your middleware logic after response
  return response;
}
Nuxt
// server/middleware/example.js
export default defineEventHandler((event) => {
  // Your middleware logic
});
Next steps
After completing your migration from Vercel to Appwrite Sites, we recommend:
- Test thoroughly - Verify all routes, functionality, and environment-specific features
- Monitor performance - Check that your site performs as expected on Appwrite
- Set up CI/CD - Appwrite already provides git integration and deployment workflows, but you can also use GitHub Actions or any other CI/CD tool to automate your deployments.
- Explore Appwrite services - Consider integrating with other Appwrite services like Authentication, Databases, and Storage
Conclusion
This guide has outlined the key steps for migrating from Vercel to Appwrite Sites. You'll find that Git integration and deployment workflows remain largely familiar, making these aspects of migration more approachable for most projects.
While domain configuration and platform-specific features like middleware require some adaptation, the framework-native approaches detailed in this guide help ensure a smooth transition.
For additional help, refer to the Sites documentation or reach out to the Appwrite community on Discord.